Monday, November 30, 2009

Convert, Encode And Decode Silverlight WriteableBitmap Data

In the comments of my Silverlight 4 EdgeCam Shots blog post "marcb" asked me how to convert the WriteableBitmap to a byte array to save the snapshot in a database.
I thought the answer might be also useful for others. Furthermore I will provide ready to use code for JPEG encoding and decoding of the WriteableBitmap.


Byte array conversion

Copy WriteableBitmap to ARGB byte array
public static byte[] ToByteArray(this WriteableBitmap bmp)
{
   int[] p = bmp.Pixels;
   int len = p.Length * 4;
   byte[] result = new byte[len]; // ARGB
   Buffer.BlockCopy(p, 0, result, 0, len);
   return result;
}

Copy ARGB byte array into WriteableBitmap
public static void FromByteArray(this WriteableBitmap bmp, byte[] buffer)
{
   Buffer.BlockCopy(buffer, 0, bmp.Pixels, 0, buffer.Length);
}

Usage
// Render UIElement into WriteableBitmap
WriteableBitmap bmp = new WriteableBitmap(UIElement, null);

// Copy WriteableBitmap.Pixels into byte array (format ARGB)
byte[] buffer = bmp.ToByteArray();


// Create a new WriteableBitmap with the size of the original image
WriteableBitmap bmp = new WriteableBitmap(width, height);

// Fill WriteableBitmap from byte array (format ARGB)
bmp.FromByteArray(buffer);

I will include the two methods in my WriteableBitmap extensions that I'm going to put up on Codeplex soon.


JPEG encoding and decoding
If you want to store many images or transport them over a network the needed storage size could quickly become a big problem. For example an image with the size 512 x 512 needs 1 Megabyte storage space and a 1024 x 768 image even 3 MB. A solution could be image compression using JPEG encoding and decoding. To accomplish this I've used the open source FJCore JPEG library which is distributed under the MIT License and works nicely with Silverlight.

Encode WriteableBitmap as JPEG stream
public static void EncodeJpeg(WriteableBitmap bmp, Stream destinationStream)
{
   // Init buffer in FluxJpeg format
   int w = bmp.PixelWidth;
   int h = bmp.PixelHeight;
   int[] p = bmp.Pixels;
   byte[][,] pixelsForJpeg = new byte[3][,]; // RGB colors
   pixelsForJpeg[0] = new byte[w, h];
   pixelsForJpeg[1] = new byte[w, h];
   pixelsForJpeg[2] = new byte[w, h];

   // Copy WriteableBitmap data into buffer for FluxJpeg
   int i = 0;
   for (int y = 0; y < h; y++)
   {
      for (int x = 0; x < w; x++)
      {
         int color = p[i++];
         pixelsForJpeg[0][x, y] = (byte)(color >> 16); // R
         pixelsForJpeg[1][x, y] = (byte)(color >> 8);  // G
         pixelsForJpeg[2][x, y] = (byte)(color);       // B
      }
   }

   // Encode Image as JPEG using the FluxJpeg library
   // and write to destination stream
   ColorModel cm = new ColorModel { colorspace = ColorSpace.RGB };
   FluxJpeg.Core.Image jpegImage = new FluxJpeg.Core.Image(cm, pixelsForJpeg);
   JpegEncoder encoder = new JpegEncoder(jpegImage, 95, destinationStream);
   encoder.Encode();
}

Decode WriteableBitmap from JPEG stream
public static WriteableBitmap DecodeJpeg(Stream sourceStream)
{
   // Decode JPEG from stream
   var decoder = new FluxJpeg.Core.Decoder.JpegDecoder(sourceStream);
   var jpegDecoded = decoder.Decode();
   var img = jpegDecoded.Image;
   img.ChangeColorSpace(ColorSpace.RGB);

   // Init Buffer
   int w = img.Width;
   int h = img.Height;
   var result = new WriteableBitmap(w, h);
   int[] p = result.Pixels;
   byte[][,] pixelsFromJpeg = img.Raster;

   // Copy FluxJpeg buffer into WriteableBitmap
   int i = 0;
   for (int y = 0; y < h; y++)
   {
      for (int x = 0; x < w; x++)
      {
         p[i++] = (0xFF << 24)                    // A
                | (pixelsFromJpeg[0][x, y] << 16) // R
                | (pixelsFromJpeg[1][x, y] << 8)  // G
                |  pixelsFromJpeg[2][x, y];       // B
      }
   }

   return result;
}

Usage
// Save rendered UIElement as JPEG file
private void BtnSaveFile_Click(object sender, RoutedEventArgs e)
{   
   if (saveFileDlg.ShowDialog().Value)
   {
      using (Stream dstStream = saveFileDlg.OpenFile())
      {
         // Render to WriteableBitmap
         WriteableBitmap bmp = new WriteableBitmap(UIElement, null);
         
         // Encode JPEG and write to FileStream
         EncodeJpeg(bmp, dstStream);
      }
   }
}


// Open JPEG file and read into a WriteableBitmap
private void BtnLoadFile_Click(object sender, RoutedEventArgs e)
{   
   if (openFileDialog.ShowDialog().Value)
   {
      using (System.IO.Stream srcStream = openFileDialog.File.OpenRead())
      {         
         // Read JPEG file and decode it
         WriteableBitmap bmp = DecodeJpeg(srcStream);
      }
   }
}

Keep in mind that the standard JPEG format doesn't support alpha values (transparency) and that the compression is lossy. So don't encode and decode images subsequently with JPEG.
It is also possible to use the built-in Silverlight class BitmapSource and its SetSource method to decode an JPEG stream.
public static WriteableBitmap DecodeJpegWithBitmapSource(Stream sourceStream)
{
   // Decode JPEG from stream
   var bitmapSource = new BitmapSource();
   bitmapSource.SetSource(sourceStream);
   return new WriteableBitmap(bitmapSource);
}

Source code
Check out my Codeplex project WriteableBitmapEx for an up to date version of the byte array conversion methods.

Monday, November 23, 2009

EdgeCam Shots - Saving Silverlight 4 Webcam Snapshots to JPEG

In my last blog post I have covered the new Silverlight 4 Webcam API and provided a demo that used my edge detection pixel shader to create a nice real time webcam effect. In this post I make an extended version available which can save webcam snapshots as JPEG files and I also discuss some limitations of the webcam API's built-in CaptureSource.AsyncCaptureImage snapshot method. Furthermore I will give some ideas on how to build a Silverlight 4 video chat / conference application on top of the provided JPEG capturing and encoding code.


Live
To view the application you need to install the Silverlight 4 runtime. It's available for Windows and Mac.


The Webcam capturing could be started and stopped with the "Start Capture" Button. If you press it for the first time you need to give your permission for the capturing. This application uses the default Silverlight capture device. You can specify the video and audio devices that are used by default with the Silverlight Configuration. Just press the right mouse button over the application, click "Silverlight" in the context menu and select the new "Webcam / Mic" tab to set them.
Press the "Save Snapshot" Button to take a snapshot and save it to a JPEG file on your harddisk.
The threshold of the edge detection can be changed using the Slider and the "Bypass" Checkbox allows you to disable the shader.

How it works
The base Silverlight 4 webcam usage code was covered in my last blog post.

The new eventhandler for the "Save Snapshot" button:
private void BtnSnapshot_Click(object sender, RoutedEventArgs e)
{
   if (saveFileDlg.ShowDialog().Value)
   {
      using (Stream dstStream = saveFileDlg.OpenFile())
      {
         SaveSnapshot(dstStream);
      }
   }
}
The code is pretty obvious: A SaveFileDialog is shown and if the user enters a file name and hits OK, a stream to the file will be opened and passed to the SaveSnapshot method. There's only one think to keep in mind when using the SaveFileDialog.ShowDialog() method, it can only be called from user-initiated code like an event handler, otherwise a SecurityException is thrown.

The SaveSnapshot method including comments:
// Render Rectangle manually into WriteableBitmap
WriteableBitmap bmp = new WriteableBitmap(ViewportHost, null);

// Init buffer in FluxJpeg format
int w = bmp.PixelWidth;
int h = bmp.PixelHeight;
int[] p = bmp.Pixels;
byte[][,] pixelsForJpeg = new byte[3][,]; // RGB colors
pixelsForJpeg[0] = new byte[w, h];
pixelsForJpeg[1] = new byte[w, h];
pixelsForJpeg[2] = new byte[w, h];

// Copy WriteableBitmap data into buffer for FluxJpeg
int i = 0;
for (int y = 0; y < h; y++)
{
   for (int x = 0; x < w; x++)
   {
      int color = p[i++];
      pixelsForJpeg[0][x, y] = (byte)(color >> 16); // R
      pixelsForJpeg[1][x, y] = (byte)(color >> 8);  // G
      pixelsForJpeg[2][x, y] = (byte)(color);       // B
   }
}

//Encode Image as JPEG
var colModel = new ColorModel { colorspace = ColorSpace.RGB };
var jpegImage = new FluxJpeg.Core.Image(colModel, pixelsForJpeg);
var encoder = new JpegEncoder(jpegImage, 95, dstStream);
encoder.Encode();
The Rectangle's surrounding Grid "ViewportHost" is rendered into a WriteableBitmap and the WriteableBitmap's Pixels are copied into another buffer with a different format. The rendered image is then written as a JPEG encoded stream using the open source FJCore library which is distributed under the MIT License. I've found some code at Stackoverflow on how to use the library in combination with the WriteableBitmap, but I modified / shortened it.
See my post on how to Convert, Encode And Decode Silverlight WriteableBitmap Data if you are interested in more WriteableBitmap conversion and JPEG encoding code.

Why not CaptureSource.AsyncCaptureImage?
You might be wondering why I haven't used the Silverlight 4 webcam API's built-in AsyncCaptureImage snapshot method of the CaptureSource class.
  1. The AsyncCaptureImage method grabs a frame directly from the device and therefore any effects like the edge detection pixel shader won't be visible in the rendered image.
  2. It only works if the CaptureSource was started, so the user can't save the visible image when the capturing was stopped. See the MSDN for details.
Please keep in mind that the first beta version of Silverlight 4 was used for this blog post and that some things will be changed in subsequent releases.

Where to go from here
The code in the SaveSnapshot method could be optimized and also multithreaded. The rendering should run in it's own thread. The encoding in a separate thread too and the network transport also. This approach would utilize modern quad core CPUs. After that it might be a good starting point for a video chat / conferencing application that continuously renders JPEGs and transports them between Silverlight clients. This technique is similar to the M-JPEG video format that also uses separately compressed JPEGs.
To make this idea usable for a Silverlight video chat, only the rendering, the JPEG encoder and the transfer method  need to be fast enough for real time streaming.
Please leave a comment what you think about it.

Source code
Download the Visual Studio 2010 solution here.

Update 03-20-2010
Updated to the Silverlight 4 release candidate.

Update 04-15-2010
Updated to the final Silverlight 4 RTW build.

Friday, November 20, 2009

EdgeCam - Silverlight 4 Webcam & Edge Detection Shader

Only 4 months after Silverlight 3 RTM came out Microsoft released the first beta version of Silverlight 4 on 11-18-2009 at the PDC. The new features are just awesome and many of them were requested by the community. Tim Heuer's great blog post covers all the new goodies in detail and provides videos and source code for most of them.
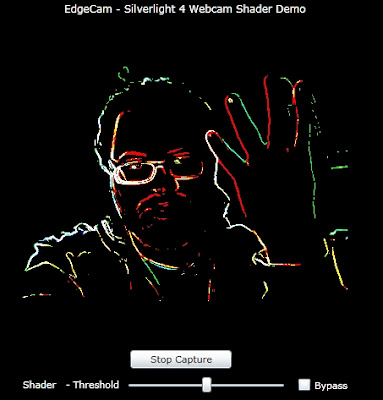
One of my favorite new features is the webcam and microphone support and I've coded a small demo that uses the new Silverlight 4 CaptureSource class and applied my edge detection pixel shader to it to create a cool real time webcam effect.

Live
To view the application you need to install the Silverlight 4 runtime. It's available for Windows and Mac. You can also watch a video below.


The Webcam capturing could be started and stopped with the Button in the middle. If you press it for the first time you need to give your permission for the capturing. This application uses the default Silverlight capture device. You can specify the video and audio devices that are used by default with the Silverlight Configuration. Just press the right mouse button over the application, click "Silverlight" in the context menu and select the new "Webcam / Mic" tab to set them.
The threshold of the edge detection can be changed using the Slider and the "Bypass" Checkbox allows you to disable the shader.

Video
I've recorded a short video with my iPhone 3GS that shows the demo running on my Samsung NC 10 Atom Netbook. The built-in webcam is not very good and the video was recorded at night, but I think it's good enough to see how the effect looks.


How it works
The new Silverlight 4 webcam and microphone API is pretty easy to use:
// Init capture devices
captureSource = new CaptureSource();
captureSource.VideoCaptureDevice = CaptureDeviceConfiguration.GetDefaultVideoCaptureDevice();
captureSource.AudioCaptureDevice = CaptureDeviceConfiguration.GetDefaultAudioCaptureDevice();

// Create video brush that preserves the aspect ratio and fill a Rectangle with it
VideoBrush videoBrush = new VideoBrush();
videoBrush.Stretch = Stretch.Uniform;
videoBrush.SetSource(captureSource);
Viewport.Fill = videoBrush;

// Ask user for permission
if (CaptureDeviceConfiguration.AllowedDeviceAccess
|| CaptureDeviceConfiguration.RequestDeviceAccess())
{
   captureSource.Start();
}
The edge detection pixel shader is applied to the "Viewport" Rectangle in the XAML. For a more intuitive behavior I've also attached a negative ScaleTransform to flip the x axis of the Rectangle. Otherwise the webcam output would be mirror-reversed by default.

Source code
The Visual Studio 2010 solution including the edge detection shader is available for download.

Update 11-23-2009
Make sure to read the follow up blog post EdgeCam Shots - Saving Silverlight 4 Webcam Snapshots to JPEG

Update 03-20-2010
Updated to the Silverlight 4 release candidate.

Update 04-15-2010
Updated to the final Silverlight 4 RTW build.

Thursday, November 5, 2009

Drawing Shapes - Silverlight WriteableBitmap Extensions III

Last week I've released the second part of my WriteableBitmap extensions methods. I've added DrawLine() methods and presented a sample application that showed that the WriteableBitmap line-drawing methods are 20-30 times faster than the UIElement Line class.

A stable and fast line-drawing algorithm is the basis for most shapes like triangles, rectangles or polylines in general. For this blog post I've extended the WriteableBitmap with some specialized methods for various shapes including a fast ellipse rasterization algorithm.


Live

The application includes various scenarios where different shapes are drawn. By default a little demo is shown that I call "Breathing Flower". Basically different sized circles rotating around a center ring are generated. The animation is done using the best trigonometric functions in the world: sine and cosine.
The scenario "Static: WriteableBitmap Draw* Shapes" presents all shape extensions currently available. From left to right: Points - SetPixel(), Line - DrawLine(), Triangle - DrawTriangle(), Quad - DrawQuad(), Rectangle - DrawRectangle(), Polyline - DrawPolyline(), closed Polyline - DrawPolyline(), Ellipse - DrawEllipse(), Circle - DrawEllipseCentered().
The other two scenes randomly draw all shapes or only ellipses and allow controlling the work load by setting the number of shapes. The Silverlight frame rate counter at the upper left side shows the current FPS in the left-most column.

How it works
Most of the new extension methods use the DrawLine() function to build up a shape. Only the DrawRectangle() method implements a simplified line drawing using some for loops which is faster than calling the DrawLine() method four times. The DrawEllipse() function implements a generalized form of the Midpoint circle algorithm. I've used "A Fast Bresenham Type Algorithm For Drawing Ellipses" from this paper by John Kennedy.
The extension methods are pretty fast and if you need to draw a lot of shapes and you don't need anti-aliasing, Brushes or other advanced UIELement properties, the WriteableBitmap and the Draw*() extensions methods are the right choice. If you don't like the sharp edges, you can apply the Silverlight 3 Blur effect to the image:


The signature of the extension methods
DrawPolyline(this WriteableBitmap bmp, int[] points, Color color);
DrawPolyline(this WriteableBitmap bmp, int[] points, int color);

DrawTriangle(this WriteableBitmap bmp, 
             int x1, int y1, int x2, int y2, int x3, int y3, Color color);
DrawTriangle(this WriteableBitmap bmp, 
             int x1, int y1, int x2, int y2, int x3, int y3, int color);

DrawQuad(this WriteableBitmap bmp, 
     int x1, int y1, int x2, int y2, int x3, int y3, int x4, int y4, Color color);
DrawQuad(this WriteableBitmap bmp, 
     int x1, int y1, int x2, int y2, int x3, int y3, int x4, int y4, int color);

DrawRectangle(this WriteableBitmap bmp, 
              int x1, int y1, int x2, int y2, Color color);
DrawRectangle(this WriteableBitmap bmp, 
              int x1, int y1, int x2, int y2, int color);

DrawEllipse(this WriteableBitmap bmp, 
            int x1, int y1, int x2, int y2, Color color);
DrawEllipse(this WriteableBitmap bmp, 
            int x1, int y1, int x2, int y2, int color);

DrawEllipseCentered(this WriteableBitmap bmp, 
                    int xc, int yc, int xr, int yr, Color color);
DrawEllipseCentered(this WriteableBitmap bmp, 
                    int xc, int yc, int xr, int yr, int color);
The DrawPolyline() method uses an array of x- and y-coordinate pairs and the array is interpreted as (x1, y1, x2, y2, ..., xn, yn). If a closed polyline should be drawn, the first point must also be added at the end of the array.
The DrawTriangle() and DrawQuad() methods needs all shape points as x- and y-coordinates. The DrawRectangle() function plots a rectangle out of the points that represent the minimum and maximum of the shape. The DrawEllipse() method interprets the parameters the same way, but the DrawEllipseCentered() function takes the center of the ellipse and the radii as arguments.
All methods are available for the Color structure or an integer value as color.

Usage
// Initialize the WriteableBitmap with size 512x512
WriteableBitmap writeableBmp = new WriteableBitmap(512, 512);

// Set it as source of an Image control
ImageControl.Source = writeableBmp;


// Fill the WriteableBitmap with white color
writeableBmp.Clear(Colors.White);


// Black triangle with the points P1(10, 5), P2(20, 40) and P3(30, 10)
writeableBmp.DrawTriangle(10, 5, 20, 40, 30, 10, Colors.Black);

// Red rectangle from the point P1(2, 4) that is 10px wide and 6px high
writeableBmp.DrawRectangle(2, 4, 12, 10, Colors.Red);

// Blue ellipse with the center point P1(2, 2) that is 8px wide and 5px high
writeableBmp.DrawEllipseCentered(2, 2, 8, 5, Colors.Blue);

// Closed green polyline with P1(10, 5), P2(20, 40), P3(30, 30) and P4(7, 8)
int[] p = new int[] { 10, 5, 20, 40, 30, 30, 7, 8, 10, 5 };
writeableBmp.DrawPolyline(p, Colors.Green);


// Render it!
writeableBmp.Invalidate();

Source code
You can download the Silverlight application's source code including the complete and documented ready-to-use WriteableBitmapExtensions file from here. Check out my Codeplex project WriteableBitmapEx for an up to date version of the extension methods.

To be continued...
For the next part of this series I'm planning to add fill extensions methods to the WriteableBitmap like FillRectangle(), FillEllipse(), etc.

Update 11-06-2009
Nokola optimized the DrawLine() function a bit and made it 15-30% faster than the standard DDA implementation. I've replaced the DrawLine() method in the extensions with Nokola's optimized version, fixed some bugs and updated the source code. The original DDA implementation is now called DrawLineDDA().
Thanks Nikola!

Update 11-11-2009
Nokola optimized the DrawRectangle() function and I've updated the implementation of it. I've also added a faster Clear() method without parameters that fills every pixel with a transparent color. This was also proposed by Nokola.
Thanks again Nikola!

Wednesday, November 4, 2009

Classic Rock evolved into Heavy Metal

Mihnea Balta released MetalScroll, a great replacement for the superb Visual Studio Add-In RockScroll:


MetalScroll is an alternative for RockScroll, a Visual Studio add-in which replaces the editor scrollbar with a graphic representation of the code. Compared to the original, this version has a number of improvements:

  • The widget at the top of the scrollbar which splits the editor into two panes is still usable when the add-in is active.
  • You must hold down ALT when double-clicking a word to highlight all its occurrences in the file
  • Lines containing highlighted words are marked with 5x5 color blocks on the right edge of the scrollbar, to make them easier to find (similar to breakpoints and bookmarks).
I have used RockScroll for a while, but encountered some bad Visual Studio crashs if I changed from code view to the Windows Forms Designer and as a consequence I had to uninstall it. Later I asked Scott Hanselman (@shanselman), who released RockScroll on his website, if he could contact the RockScroll author Rocky Downs and ask him for the source code, so I could fix it and might release it as open source, but Scott Hanselman never got an answer from the RockScroll author. You can imagine how pleasantly surprised I was after I had read the MetalScroll news from Johan Andersson (@repi) today.


My favorite feature is not the smart Scrollbar nor the cool splitter, it's the word occurrence highlighting, a feature that I missed since I worked with Eclipse years ago.
MetalScroll works with Visual Studio 2005 and 2008 and it's free and even open source! So don't hesitate, download and install this great Visual Studio add-in now. You won't be disappointed.

Thanks Mihnea Balta for your awesome work!